Recording Audio and Video on Apple Silicon Macs: A Setup that Works
⚠️ This setup works for Apple Silicon Macs. It would probably work on Intel Macs (especially if they run MacOS Big Sur and newer) but I haven't validated that.
I thought audio/video recording would be as easy as plug-and-play.
Turns out I was wrong. 👎
My requirements were pretty simple:
- Record device audio: Audio signals coming from system/applications/etc on the device (if you just want to pick up microphone audio - use QuickTime Audio Recording)
- Record microphone audio: Audio signals recorded via headset or external mic
- Record display video: Record what I see on my screen
- Record webcam video: Record my beautiful mug 👹
- Apple Silicon Mac compatibility: In late 2020 Apple released a suite of amazing new devices (Mac mini M1; Macbook Air M1; Macbook Pro M1) with an updated OS but many applications are not yet customized for the new Apple Silicon chips [date of writing: 1/2021]. Bottomline: many how-to posts/videos are outdated.
Below is a summary of what needs to be done to get your audio/video recording setup to work on your Apple Silicon machine. 🎉
Multi-Device Input/Output: Hardware and Software
While many roads lead to Rome, I'll document what worked for me and hope that it helps you.
Hardware: A Small Desktop Setup
In my setup I have the following:
- Audio Interface: Input/output management for multiple audio sources
- Microphone: Record clearer sound on your end
- Webcam: Record crisp video on your end
- Headphones: Listen to computer and counterpart audio - helps avoiding reverb and echo
Software: Mix of Open-Source, Freemium, and Paid
- OBS (free): This is the heart of the recording setup. OBS allows to record and stream multi-device inputs and outputs + has a direct integration with twitch, youtube, and facebook for one-click streaming 👌
- iShow U Instant ($24 - $39 license): Software that aggregates multiple inputs and outputs into a single audio setting in your dock 🔌
- VLC Player (free): If you want to record and play back your recordings in
.mkvsince you can't open this file type with QuickTime - Discord (freemium): Technically discord is not required but if you want to record sound from a call that is [1] free of charge, [2] has no time limits in the free tier, and [3] has crisp audio (courtesy of their automatic noise suppression tech) 🤙
Setting up Audio/Video Recording on Apple Silicon Macs
Initially I read through the OBS documentation for Mac users and found this:
Unfortunately the click path leads to a version for mojave and earlier OS. No good.
After finding a relevant reddit thread it pointed me to this video:
Just follow the instructions from the video or read through the written summary below. 👇
#1 Install OBS and iShowU Instant
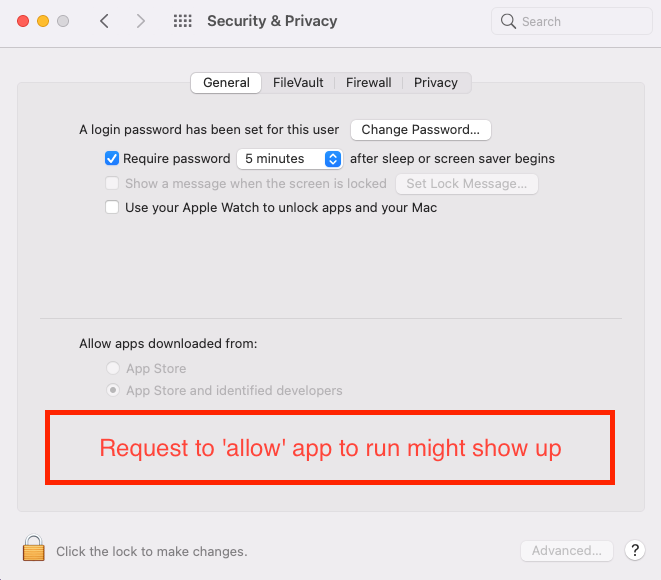
⚠️ Important: Since the install is via 3rd-party website and not via app store you might have to go to your Security & Privacy (navigate via spotlight search) settings of MacOS and allow the app (by "shinywhitebox" = developer name) to run:
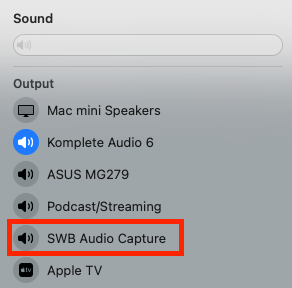
To check if the app is properly installed it should up when you click on Sound in your menu bar:
#2 Audio MIDI Setup
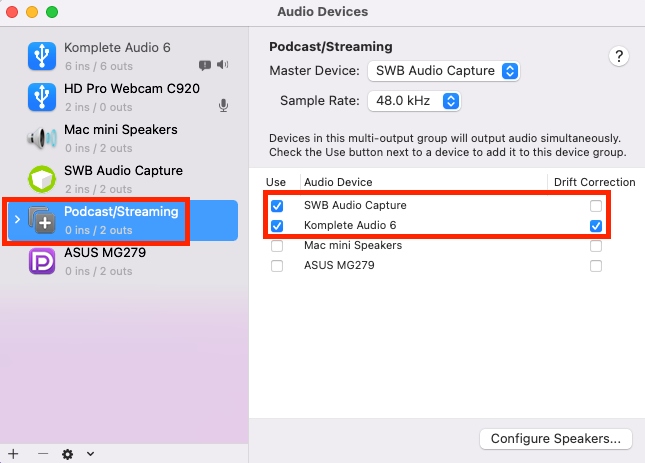
Then go to Audio MIDI Setup in your OS and create (+) a Multi-Output Device:
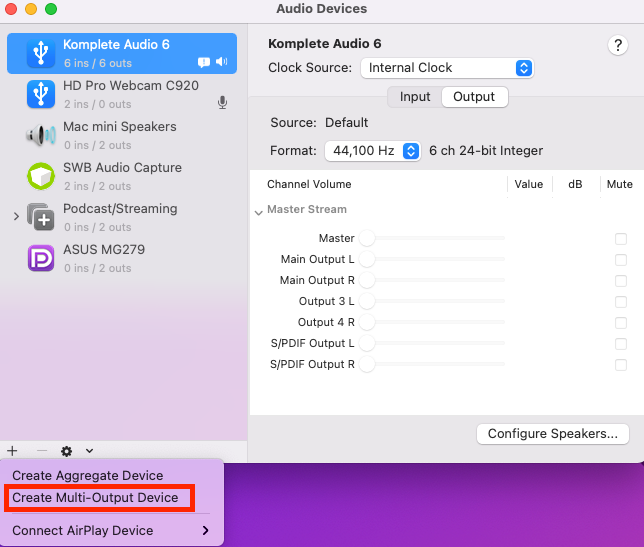
In the newly created instance do the following:
- Select the outputs you would like to hear and record: In my case it was the audio interface (= headphones/speakers for monitoring) and the SWB instance (= computer audio)
- Rename your multi-output device: For the purposes of this post I named it Podcast/Streaming
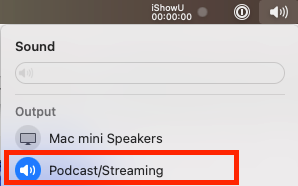
#3 Select up the Correct Output
Go to your Sound settings in your OS menu bar and select the newly created multi-output device:
#4 Mic Setup
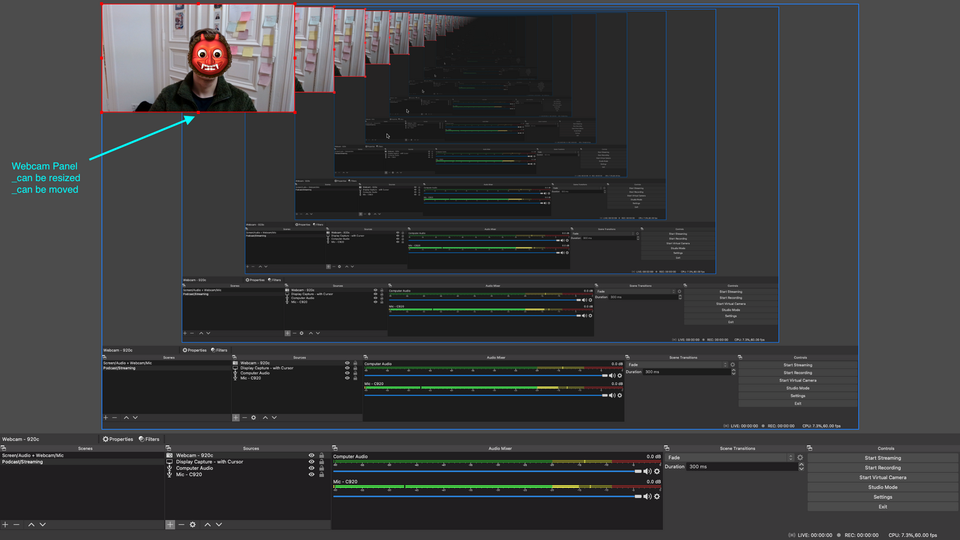
Launch OBS. See explainer screenshot below:
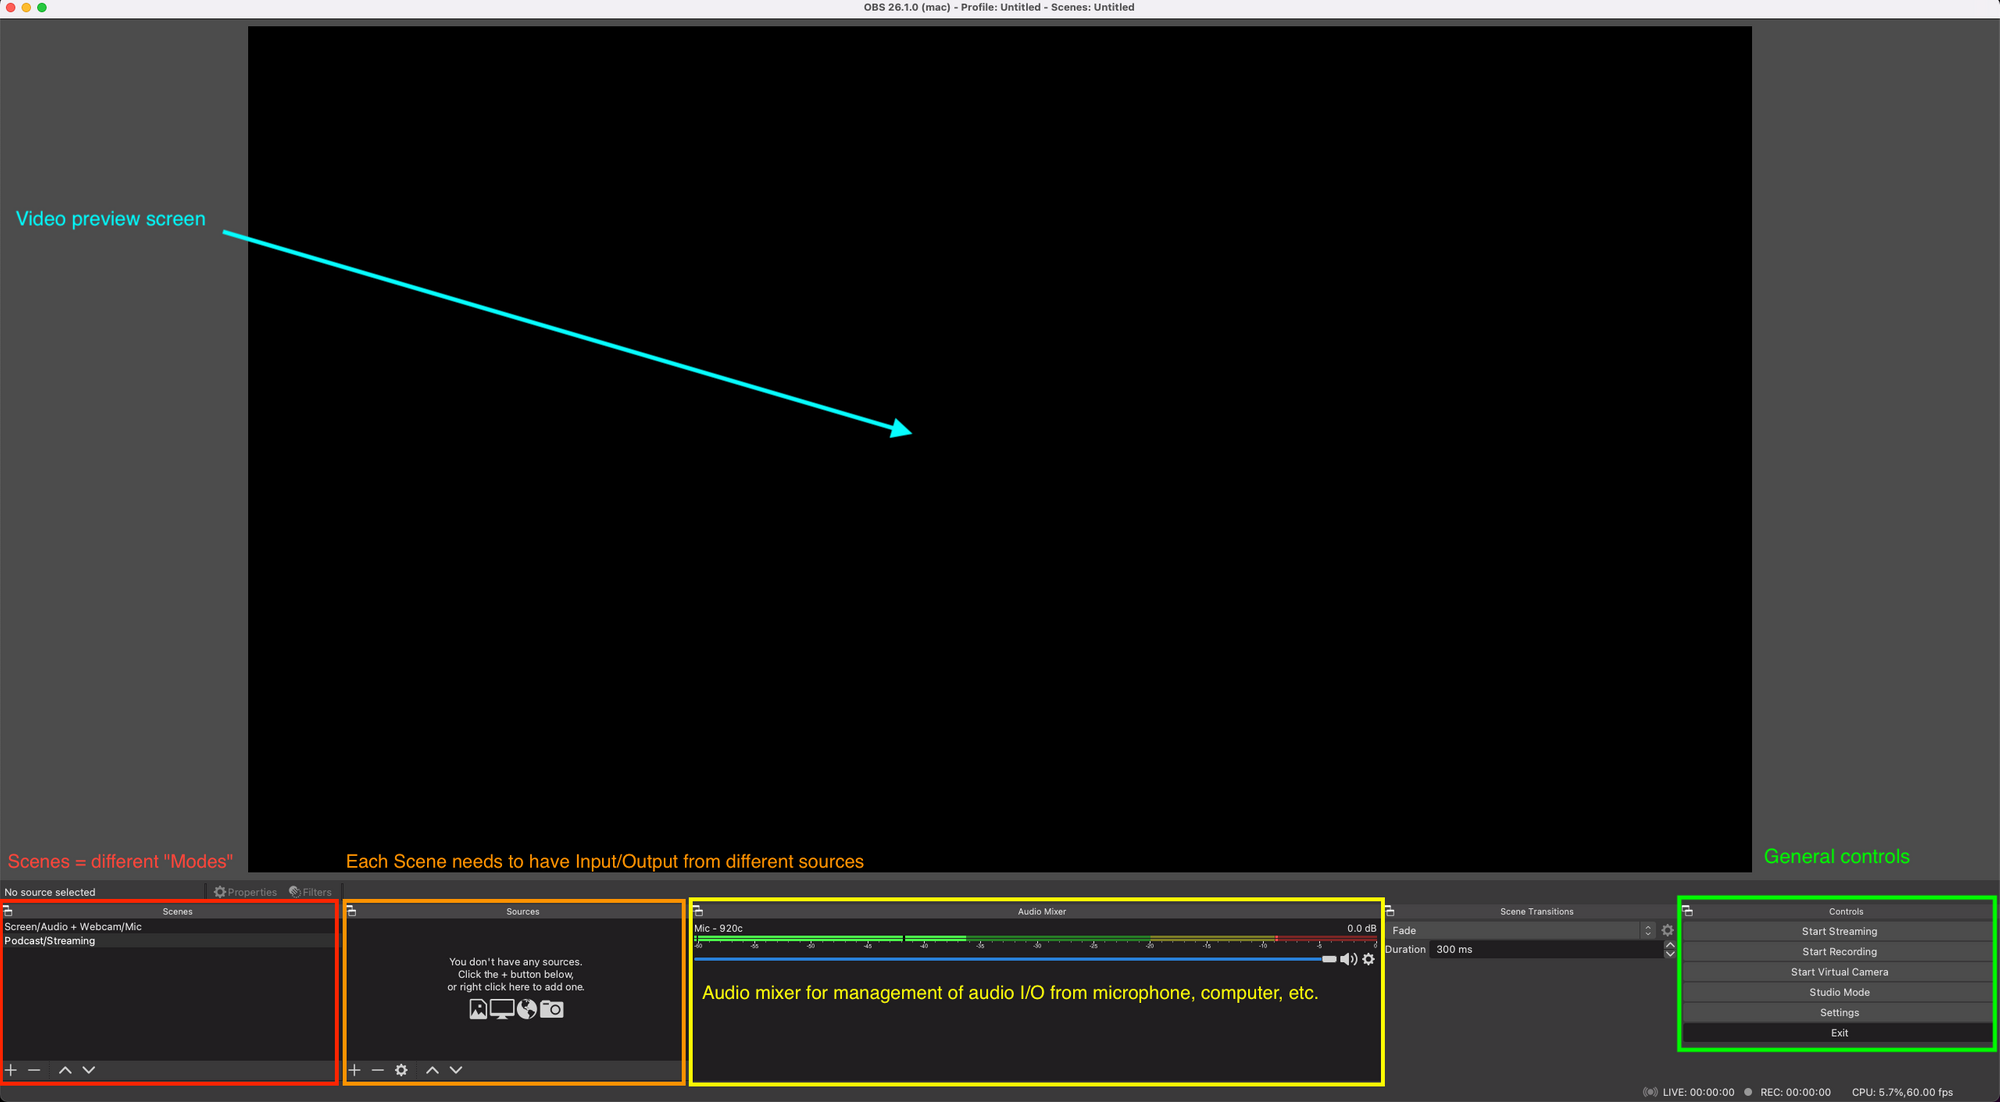
⚡ Tip: For every input/output in OBS you should always [1] set it up according to your preferences and [2] name it so you can find it quickly. This will make your life much easier.
The first thing you want to do is to set up your microphone via the cog wheel and clicking on Properties. Then select your desired microphone input from your drop-down.
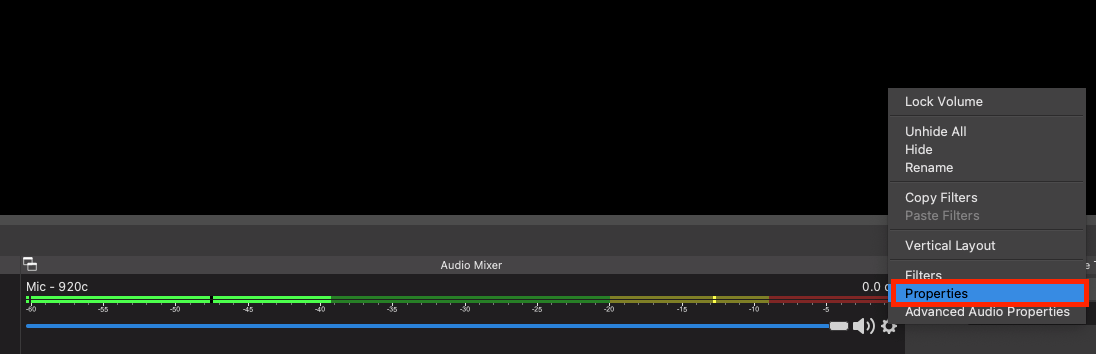
⚡ Tip: For a centered sound of your voice you would want to go to Advanced Audio Properties and check the Mono check box to convert your microphone input into a mono signal.
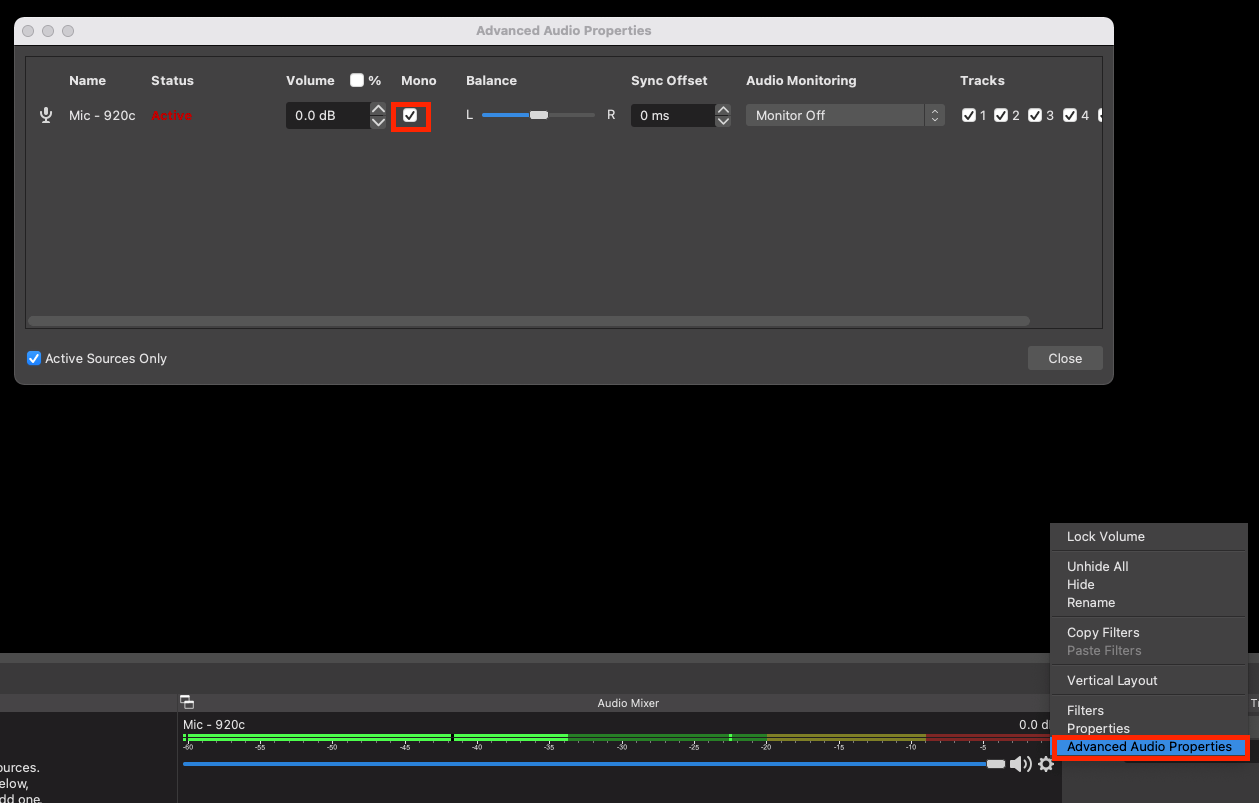
⚠️ Important: If you want to keep an input signal in stereo (e.g. DJ mixer; spotify via device; etc.) keep this box unchecked.
In the Sources section add (+) an Audio Input Capture and select microphone:
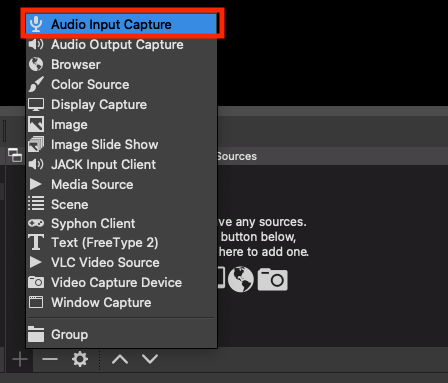
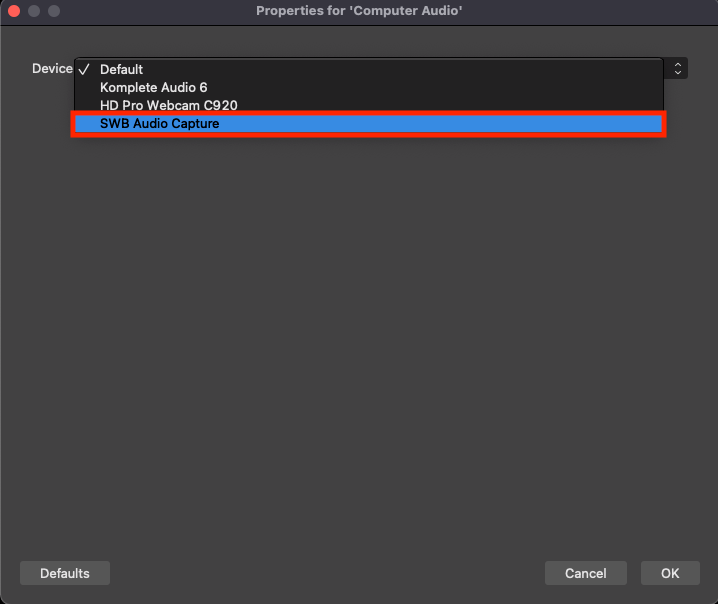
#5 Setting up Computer Audio Capture
Go to Sources add (+) another instance of Audio Input Capture. This time select the SWB Audio Capture, which was previously created in the Audio MIDI Setup:
#6 Screen Video Capture
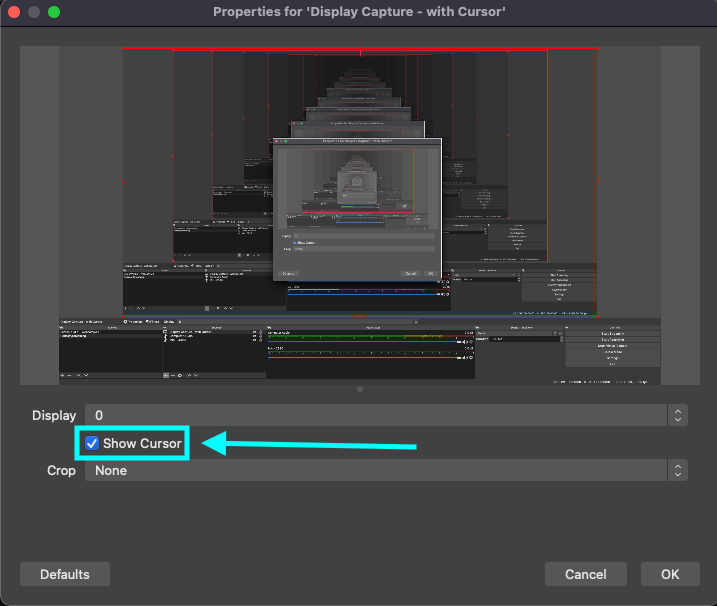
Yet again, go to Sources and add (+) a Display Capture:

And give it a name:
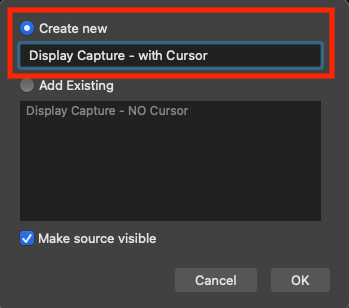
⚡ Tip: Depending on how you plan on capturing your screen you would want to either check or uncheck the Show cursor box.
#7 Webcam Setup
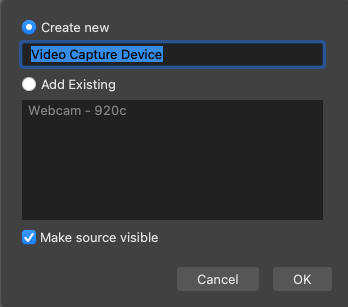
Go to Sources and add (+) a Video Capture Device:

You can create a new device or add an existing one.
Once it is set up and named your OBS interface should look something like this:

#8 Recording
Going on air with OBS is straight forward.
You select your desired scene and click either [1] Start Streaming or [2] Start Recording.
⚡ Tip: Record your videos as mkv or flv files instead of mp4. Read this article for more info.
Following these should do the trick and you should be able to record audio and video from various sources. 🙌
2 more things to keep in mind:
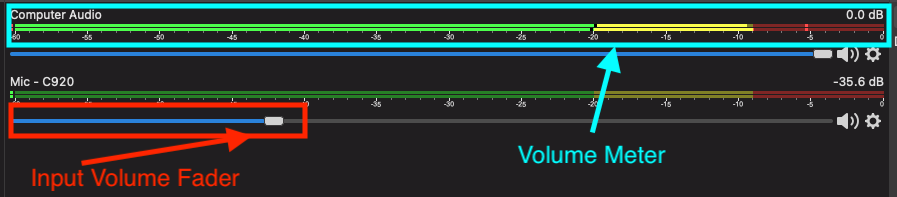
Adjust input levels
When recording audio you want to avoid clipping.
⚠️ Important: To be on the safe side do a sound check where you test the audio input at its expected volume. Look at the volume meter (green/yellow/red) and adjust the input volume fader (blue) to a level where the volume remains mainly in the green area.
Adjust audio output in the apps you want to record
Make sure the audio is outputting to the correct sound output.
I did a couple of test calls on discord to make sure that I could record video and audio. I could hear myself and everything that was playing on my computer but I couldn't hear the other people's voices on the recording.
This lesson took me 2 hours to figure out. Yet it's so simple.
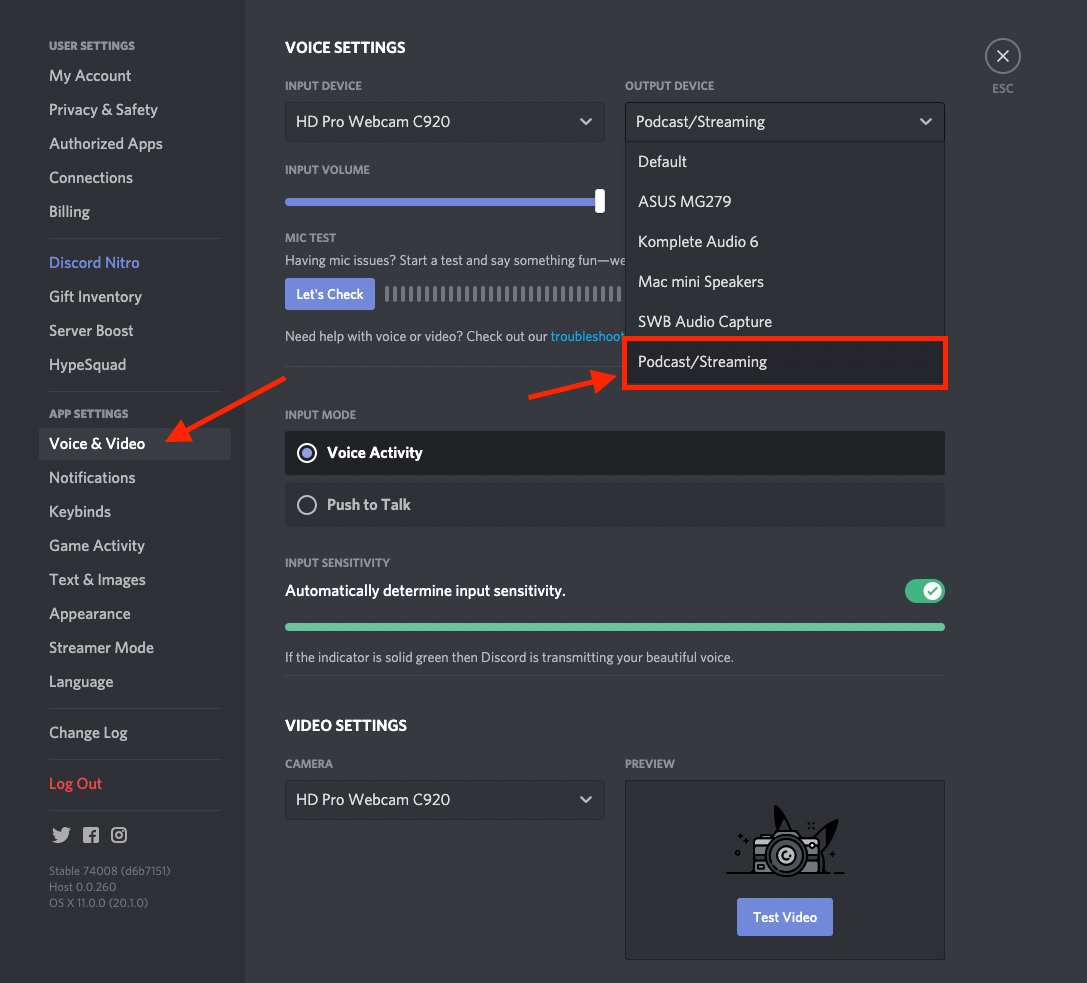
⚠️ Important: Go into the app's settings, usually found in the menu bar when you click on the app name and go to Preferences. In discord go to Voice & Video and in the Output Device dropdown select the output device you have selected in step #3 (see above).
[Bonus] Additional Resources: Podcasting, Streaming, and Knowledge Management
You might be a creator, a streamer, a marketer, or just someone who needs to record a video. Here are some of the finest resources from around the web.
🎙️ Podcasting: Remote Interview Recording
This one is simple: You want to record a video or audio conversation with someone in a remote location.
Further resources:
- How I Produce Podcasts (David Perell)
- Podcasting for Beginners: The Complete Guide to Getting Started With Podcasts (Buffer)
- Podcasts as Growth Tool for Businesses (Chris Walker)
👾 Streaming: Gaming and Music Streams
Streaming games or live music to a remote audience.
Further resources:
- Twitch Stream Basics (Twitch)
- Apple Silicon Games (Tosh) - All about Gaming on Apple Silicon by Mac Gamers for Mac Gamers.
- Twitch Music: Fast Start Guide (Twitch)
- My process of making a vinyl set episode (My Analog Journal)
📚 Knowledge Management: Recording Tutorials, Explainer Videos, and more
One of the most useful applications of video might be in the professional context. Building a company and scaling a team benefits from good documentation of knowledge and processes - this is especially true if you are building a remote company.
Your time is usually the most valuable resource. You might get the same questions/requests/etc over and over again. The solution in such cases is usually to standardize, templatize, and automate.
For the case of recurring knowledge-related questions/requests, it helps to record a video answer. After recording save/link it in a centralized knowledge repository (wiki/etc.) and share it with your team - ideally have a single-source-of-truth location where people would go and look if they have questions.
Further resources:
- Video Use Cases (Loom) - Loom is a great product and does the trick if you want to screen capture + audio + your webcam. In case you need an external participant or just want to do it yourself you can use the OBS setup.
- Video Documentation Guidelines (GitLab)
- Best Practices for Managing a Remote Team (Y Combinator)
[Bonus] TV Killed the Radio Star: Use Cases for Video Content
Video is cool. 😎 Create it once and you can repurpose it in many different ways:
- Full-length video for distro on main platforms (youtube; twitch; etc.)
- Short video clips (highlights; snippets) for distribution on other platforms (twitter; linkedin; etc.)
- Audio tracks only for distro on audio platforms (soundcloud; spotify; etc.)
- Transcriptions for own blog (boosts SEO) and as a basis for new content pieces
- ...
As Ross Simmonds would say: "Create once. Distribute forever."
If you have feedback, let's connect on twitter. If you liked it, please share it with someone.
Thanks for reading!